Sunday, February 27, 2011

St. Patrick's Day Rosettes

A bright shade of green always reminds me of Spring and I'm ready for Spring.

I gathered up lots of scraps of various shades of green paper and die cut them using the Sizzix, Paper Rosettes die. I also die cut several Scallop Circles #2 to add some variation.

I created larger rosettes by doubling-up the Rosette strips (see tutorial below). I printed out the sayings on my computer and used a circle punch. I glued everything together and wanted to find a unique way to display them for St. Patrick's Day.

I recently thrifted some silver sugar bowls and had several mis-matched lids. I used 26 gauge, silver wire (24 gauge might have been better for more stability) and wrapped it around the knobs on the tops of the silver lids. Next I worked the wire until I had a nice, wide arc and used some pliers to create a hook on the end.

I punched a tiny hole in the rosette and balanced them on the hook above the silver lids.

Now all I have to do is wait for St. Patrick's Day.

HOW TO MAKE EXTRA-LARGE PAPER ROSETTES:

To create the larger Rosettes you will need to die cut two pieces (step 1). Glue them together leaving about 1/4" overlapping (step 2). Accordion fold in the same way as a regular-size Paper Rosette (step 3). Glue the ends together to create a tube (step 4). Following the instructions for a regular-size Paper Rosette, gather the ends and gently press down to fan out the sides. You will need to do this part very gently because the outer edges are being stretched and you don't want this to tear. Once it is flat, hot glue the die cut round piece to the center on both the front and back. (step 5).


I attached several Rosettes to a piece of ribbon and created a banner.


Please comment on my GIVEAWAY post here and become a Follower for a chance to win some vintage ephemera. {Giveaway is now closed}

This is linked to:
All Thingz RelatedBetween Naps on the Porch, Blue Cricket Designs, Chic on a ShoestringCraft Envy, DIY Home Sweet Home Project, FaveCraftsFinding FabulousHouse of GraceI {heart} Naptime, Keeping It Simple, Krafty Kat, Lovely Crafty HomeMaking the World Cuter, My Backyard Eden, My Romantic HomeMy Uncommon Slice of Suburbia, Paisley Passions, Passionately Artistic, Simply DesigningSkip to My Lou, Someday Crafts, Somewhat Simple, Tales From BloggeritavilleThe Girl Creative, The Shabby Chic Cottage, The Shabby NestThe Thrifty HomeThe Trendy TreehouseUnder the Table and Dreaming, Very Merry Vintage Style,What's Allie Making Now, Wildflowers and Whimsy and Young Nesters

This has been featured on:


I've Been Featured Button


Saturday, February 26, 2011

Pyrex and Linens Estate Sales

We were able to get to quite a few estate sales today. The hunt is just so exciting.

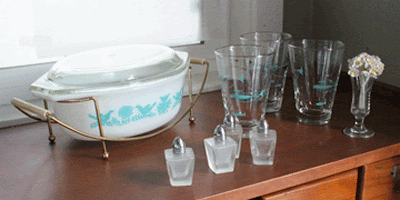
My favorite find were these vintage, turquoise and silver, Libby, Atomic Fish pattern glasses and Pyrex Bluebird pattern casserole with cradle (1959-1961). I also found four little glass, salt and pepper shakers and a small glass vase.

We also found two silver, "quadruple"-plated pieces by the St. Louis Silver Co. The company, best known for making beer steins, went out of business in 1912 so they have to be from the late 1800s to the early 1900s. I think their shapes are so elegant.
To continue with my habit of finding vintage board games, I found this 1967 edition of Go To the Head of the Class. My favorite character piece is a kid named "Cowboy Joe". In 1967, "Mommy" wore pearls and "brother" wore a turtleneck under his cardigan. The illustrations are classic 60s.

I found a box of lace. Some of the lace is handmade which amazes me with the patience required to make this. There was also some lace collars which I'm not sure what I want to do with them but they are so beautiful.
There was also a stack of unused, white, cotton tea towels. The quality of these towels is so nice compared to modern tea towels. I can use these for crafting projects.

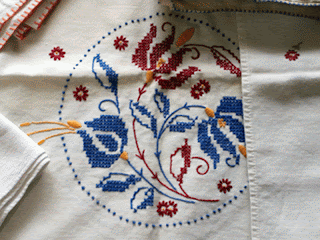
There were also several embroidered towels. My favorite one has a cat in an apron sweeping but it is embroidered in white on a white towel so it is hard to see. There are also two floral baskets, a bird with tea pot and a red and blue design towel. Plus there was a small, pure silk table cloth with embroidered Thai temple images. 


The linens would look a lot better if they were ironed but I am always so excited to post as soon as possible. 

It was a good day hunting for treasures. We had such a great time but I think I need to open an etsy shop soon or I'll be featured on Hoarders. 

This is linked to:

Sunday, February 20, 2011

Handmade, Die Cut Flowers

This was one of those projects where I had a vision in my mind of how it would look when completed but it took a little more time than I expected. This is a birthday gift for a friend. Each flower is die cut from vellum using the Sizzix, Flowers, 3D die.

Each die cut flower was lightly inked along the outer edges with Worn Lipstick, Distress Ink. I assembled the flowers following these instructions and used hot glue to hold them together.

Next, I cut 2-inch pieces of 26 gauge floral wire for each of the smaller flowers. I wrapped the wire with floral tape leaving about an inch of extra tape at one end and about a quarter of an inch of wire unwrapped.

I poked a small hole in the bottom of the flower and placed a small dot of hot glue over the hole.

This next part was a little tricky. I then quickly inserted the wire into the hole just enough to hold it when the glue dried but not so deep as to show in the center of the flower. After the glue was dry I finished wrapping the tape around the base of the flower. I placed a small dab of white glue to hold the tape closed.

Next, I wrapped floral tape around 18 gauge floral wire to use as the main stem. About four inches from the end of the wire, I stopped wrapping and added the base of the smaller flower stem and wrapped them tightly to hold in place.

Once the base was secure I bent the small flower stem aside and continued wrapping the main stem leaving about an inch of wire unwrapped.

I attached the larger flowers a little differently. I used a large, decorative pin and pushed it into the center of the flower and out of the back to act as a small stem.

I then wrapped the pin to the 18 gauge wire to securely hold it in place.


After all of the flowers were completed, I arranged them in the vintage, Moonstone Hobnail vase I thrifted at this estate sale and added silk leaves that I thrifted from this sale.

The finished project looks exactly how I envisioned it at the beginning. The only thing I didn't envision was how sticky my fingers would be after handling hot glue, white glue and floral tape.

Honored to be Featured at:


Linking to:
504 MainAll Thingz RelatedBetween Naps on the Porch, Blue Cricket Design, Brambleberry Cottage, Chic on a ShoestringCoastal CharmCrafts Keep Me SaneDIY Home Sweet Home Project, FaveCraftsFinding Fabulous, Frugalicious Me,  I'm Topsy TurvyKrafty Kat, Lovely Crafty HomeMaking the World Cuter, Marvelously Messy, My Romantic HomeMy Uncommon Slice of Suburbia, Paisley Passions, Passionately Artistic, Sunburnt Cow The Shabby Chic Cottage, The Shabby Nest, Simply DesigningSomeday Crafts, Somewhat SimpleThese Creative Juices, The Thrifty Home, The Trendy TreehouseThe Girl Creative and What Allie's Making Now.

Saturday, February 19, 2011

Estate Sale Board Games

The weather forecast was for rain this weekend so there weren't many local estate/garage sales to choose from. We found three vintage board games that are destined for my crafting supplies rather than decorative items. {Due to many encouraging comments, I will definitely keep the Clue and Easy Money games intact.}

The first board game is a 1949 edition of Clue. The weapons are made from metal and the markers are wood. The Detective Notes pad is intact and only missing a few sheets. I love the graphics on the suspect cards.


The second board game is a 1939 edition of Bingo. The cards and markers are so nicely vintage.

The final board game is a 1956 edition of Easy Money. It appears to be similar to Monopoly. The markers and houses are all wood.

There are so many crafting posibilities with these items. These will be set aside for a possible rainy day project.

Linking up to:
Apron Thrift Girl, The Colorado Lady, Common GroundTales From Bloggeritaville and Hey What's For Dinner Mom?

Monday, February 14, 2011

Scrabble Board Valentine's Day Card

Valentine's Day is finally here. And I can't help it but I just couldn't make a regular Valentine's Day card for my boyfriend. I knew that I wanted to do something unique and finally decided to upcycle a Scrabble board since it folded like a giant card and I could use the tiles to spell out my sentiment.

I cut lots of little rectangles from various pink shades of Basic Grey papers. I needed a light, medium and dark selection for the heart pattern to work. I adhered them with Mod Podge which worked well but I decided that it was best not to fold the board after the Mod Podge dried to avoid cracking.
Happy Valentine's Day!

This is linked to:

Sunday, February 13, 2011

Noodles & Company Valentine Treat

As a treat for Valentine's Day, my boyfriend and I went down to San Diego for the day. Our main goal was to dine at the Noodles & Company restaurant using the gift certificate I won at Eileen Hull's Noodle Ornament contest. And in case you want to see my winning noodle ornament, click here.

We arrived in San Diego a little early so we decided to go to our other San Diego destination, the Paper Tales store. This is a great scrapbooking/paper crafting store. Not only do they carry a nice selection of papers, they also sell individual vintage items like dominoes, costume jewelry, bingo markers and such. It is a treat just to look at everything that they carry.

We also wandered around the shops at Seaport Village along the waterfront. And I even had a chance to stop in at a Goodwill store and found the start of a new project.

Then off we went to the Noodles & Company near the San Diego Sport Arena. I am a big noodle fan, always have been, always will be. Clutching my gift certificate and letter of congratulations from Jaclyn at Noodles & Company, we stood there looking at the great selection of noodle dishes. We selected the Pad Thai and Indonesian Peanut Saute. Both were excellent and their prices are very reasonable.

The food was great, the restaurant was really nice and if/when they open one in Orange County {hint, hint}, I will visit there often.

Thank you Jaclyn and Eileen. We had a wonderful meal and I agree with Eileen when she said "I Love Noodles & Company."

Saturday, February 12, 2011

Polite Estate Sale Etiquette

Patience has paid off for today's estate sale hunting. I had gone to a pre-sale on Thursday but the seller was so unorganized and stressed that she didn't have everything unpacked. She would grab things out of the buyer's hands and tell them that it wasn't for sale. Everything was chaotic but she said that the sale would continue throughout the weekend so please come back.

Today I went back and am so glad I did. I found several boxes marked "Christmas" hidden under a table and asked if I may look inside. The seller was still unorganized but I was polite and she sat down next to me while I carefully opened and unpacked the boxes. This is what I found in one box:
I love vintage bottlebrush Christmas trees but have never found any at a price that I wanted to pay until today. There is also a wreath in the middle. The largest tree is 14.5" tall. The smaller trees are stamped "Japan" on the bottom. The plastic reindeers will be used for another craft project I have planned.

Digging further into the boxes I found a few vintage ornaments and an odd batch of vintage glass balls on floral picks.

I plan to use the glass ball picks for a future project.

Buried in one box was this Napco figurine. Very sweet. I don't collect figurines but she looked so sweet and Christmas-y.

I also found a collection of Fenton or Hocking Moonstone Hobnail glassware pieces (I love the description of Moonstone). I just wanted a couple of pieces but the seller gave me such a good price on everything that I took the entire lot.

I also found this very tall, green, glass vase. I don't know anything about colored glass so this could either be vintage or something that a recent florist gave away with their arrangement. I just liked it for its height.

And as a final bit of whimsy, I found a vintage washboard, a tin toy tool chest (empty) and a glass jar that is supposed to be part of an electric mixer but I will use it to hold my art pencils.

The day started off slowly but I had such a great time at this last estate sale. Patience and politeness paid off today. But I still wonder what was hidden in the other boxes that the seller had not yet opened. (Click here to find out what was in those boxes.)

Here's an idea to store your glass Christmas ornaments, use the plastic container that apples come in from Costco. The shape is perfectly designed to hold round objects as well as to protect the contents. You can add a little tissue paper or shredded paper around each ornament and stack these neatly away. Plus it gives a little hug to the planet by not throwing more plastic into the landfills.


I was featured:


Related Posts Plugin for WordPress, Blogger...